Pagename: php - Php
Category:Array
Post Count: 5Category:Wordpress
Pagename: php - Php

WordPress – Moving wordpress installation to subfolder

After installing wordpress into home directory (ie public_html ) I realised it is not as clean as one would want when working with numerous addon domains. Far better, in my opinion, to have the wordpress folders and files in a separate sub-folder for the sake of tidyness.

Sites I used for this information were:

  1. askwpgirl – move-wordpress-from-subdirectory-to-root-directory
  2.  

The steps I took are:

    1. Create sub-folder to use
    2. Move wordpress folders & files to new sub-folder
    3. Logged into the wordpress console using the url with the sub-folder included (ie example.com/sub-folder/wp-admin)
    4. Specify sub-folder in wordpress’s general settings:
    5.  


Steps taken to move from home folder to separate sub-folder:

Leave a Reply

Your email address will not be published. Required fields are marked *

Category:General
Pagename: php - Php

WordPress – Links (Reference…)

Useful links:

Creating custom tables in wordpress
Clear example of adding ‘custom table’ to wordpress database
Guide to flexboxes
Easy to follow example of flexbox CSS

Leave a Reply

Your email address will not be published. Required fields are marked *

Category:General
Pagename: php - Php

WordPress – Google Analytics (ga) tracking code as a plugin

For wordpress sites I build, I insert the google analytics (ga) tracking code into the html head section via a plugin. The code for this is shown below. Alternatively, it is relatively easy to slip the tracking code directly into the ‘header(s)’ template (Located: your-site.com\wp-content\themes\active-theme\header.php) as described by google analytics on the ‘tracking-code’ page. However, I prefer the ‘cleaner’ approach of separating the code into a separate file. So much easier to read if it is ever required…

I also use the WordPress function ‘is_user_logged_in’ to remove most of my visits to the site as I am typically signed in to my WP admin account.

Here is the code:

<?php
	/*
	Plugin Name: Site-Name Google Analytics Plugin
	Plugin URI: http://--relevant url?
	Description: Adds the Google analytics tracking code to ... Site-Name
	Author: Author name
	Version: 1.0
	 */
	/* 
	Do not insert tracking code if the user is logged in (ie internal traffic) 
	This is wrapped in a function (insert_ga_tracking() ) so it can 
	be loaded with the 'init' hook. An error can be produced otherwise...
	*/
	

	function insert_ga_tracking()
	{
		if ( ! is_user_logged_in() )
		{
			add_action( 'wp_head', 'Site-Name_google_analytics', 10 ); 
			function Site-Name_google_analytics() 
			{ 
?>
				<!-- Global site tag (gtag.js) - Google Analytics -->
				<script async src="https://www.googletagmanager.com/gtag/js?id=UA-12345678-1">
				</script>
				<script>
				  window.dataLayer = window.dataLayer || [];
				  function gtag(){dataLayer.push(arguments);}
				  gtag('js', new Date());

				  gtag('config', 'UA-12345678-1');
				</script>

<?php
			}
		}
	}
	add_action('init', 'insert_ga_tracking');

To use this code…

Create a php file in the folder location: Site-Name/wp-content/plugins/ and add the script above to this file.

The tracking code between the double quotation marks on line 25 needs the tracking code supplied by google for your site (located in the admin/tracking for your google analytics property).
‘Site-Name’ in the code above can be changed to the target site or removed (in all four locations…). I add the site name as a check to ensure the right tracking code goes to the right site location.

Then, in the WP Admin dashboard, go to ‘installed plugins’ and activate the plugin which should be displayed with the name you specified ‘Plugin name’.

That should be all there is to it but don’t forget to test it using google analytic’s testing feature.

Leave a Reply

Your email address will not be published. Required fields are marked *

Category:General
Pagename: php - Php

WordPress – Child Theme Steps

Summarizing the steps explained in the WP Codex for creating a child theme.

Source:https://developer.wordpress.org/themes/advanced-topics/child-themes/

  1. Select theme to use via WP dashboard -> Appearance -> Themes
  2. Create new folder named after selected theme with ‘-child’ appended to the end (ie ‘Theme Name-child’)
  3. In the theme child folder, add these files:
    1. style.css
    2. functions.php
  4. Insert this header information in the ‘style.css’ file
    /*
     Theme Name:   Twenty Fifteen Child
     Theme URI:    http://example.com/twenty-fifteen-child/
     Description:  Twenty Fifteen Child Theme
     Author:       John Doe
     Author URI:   http://example.com
     Template:     twentyfifteen
     Version:      1.0.0
     License:      GNU General Public License v2 or later
     License URI:  http://www.gnu.org/licenses/gpl-2.0.html
     Tags:         light, dark, two-columns, right-sidebar...
     Text Domain:  twenty-fifteen-child
    */
    
    
  5. Update this information ensuring that:
    1. Theme name is unique (best practice is to use the name of the parent theme with ‘child’ added to the end
    2. Template lists the name of the parent theme
  6. Insert this script into the function.php file (that was created for the child theme)
    <?php 
    
      add_action( 'wp_enqueue_scripts', 'my_theme_enqueue_styles' ); 
    
      function my_theme_enqueue_styles() { 
    
        // Example: 'parent-style' is 'twentyfifteen-style' 
        //           for the Twenty Fifteen theme
        $parent_style = 'parent-style'; 
    
        wp_enqueue_style( $parent_style, get_template_directory_uri() . '/style.css' ); 
    
        wp_enqueue_style( 'child-style', get_stylesheet_directory_uri() . 
            '/style.css', array( $parent_style ), wp_get_theme() );
    
        get('Version'));
    
      }
    ?>
    
    
  7. NOTE: Ensure the $parent_style variable is set to the handle used by the parent theme. The handle can be found by searching in the parent’s theme folder for the ‘functions.php’ file and searching for: ‘wp_enqueue_style’. The first argument is the handle to use.
  8. To display an image in the WP theme selection an image named ‘screenshot’ needs to be added to the child theme folder.
  9. Child theme should now be able to be selected in the WP dashboard (Appearance->themes).
  10. Update css in the style sheet, functions in the functions file and copy over any theme templates that you want to modify. Modifications will not impact the parent theme and updates to the parent theme will not erase the changes made in the child theme.


Leave a Reply

Your email address will not be published. Required fields are marked *

Category:Software
Pagename: php - Php

WordPress – Steps to import MySQL DB from online host to localhost

Steps I use to import data (ie posts, settings info etc) from my online hosting account to the MySQL database on my localhost (ie my own pc). This will not import any files such as plugins, updates or uploaded images. Those files need to be transferred separately with a file transfer program such as filezila. This post covers exporting and importing the wordpress Database. NOTE: I do not claim this is the most efficient or the most secure method. It is simply how I do it. I use:

  • XAMPP to run the apache server
  • MySQL workbench to import the DB file onto my pc
  • phpMyAdmin via my online hosts cpanel to create the export file

Steps in short:

  1. Backup database from localhost using MySQL client ( I use MySQL workbench) – I am normally able to skip this step
  2. Export data from online hosting site using phpMyAdmin
  3. Modify site settings (urls) in exported file
  4. Import data from SQL file created in phpMyAdmin by running SQL scripts in MySQL workbench

Details:

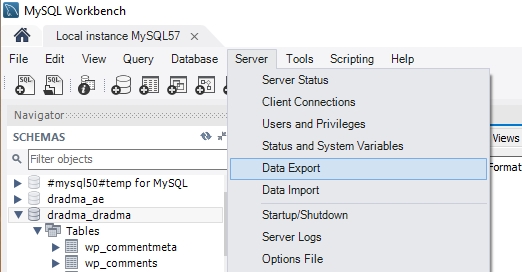
1. Backup database from localhost using MySQL client. Screen shots shown here are using MySQL workbench…


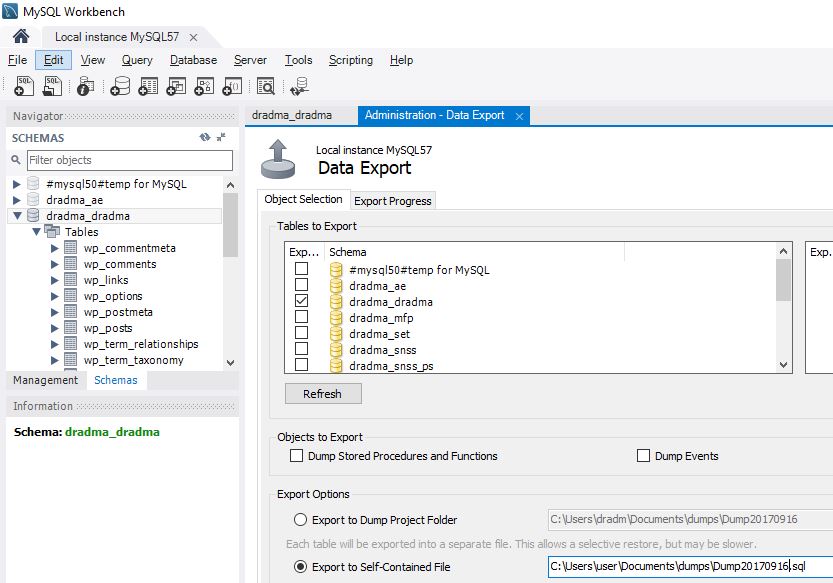
Export as a single file:


Archive the file for backup. I typically give the file a more meaningful name and I will select the ‘include create schema’ box as shown below:


2. Export data from online hosting site using phpMyAdmin

  1. Access hosting account using cpanel
  2. Locate and open phpMyAdmin (in cpanel Database category)
  3. Use phpMyAdmin to export a copy of the desired online database by:

a) Locate database in database list


b) Use ‘Export’ function to view export options:


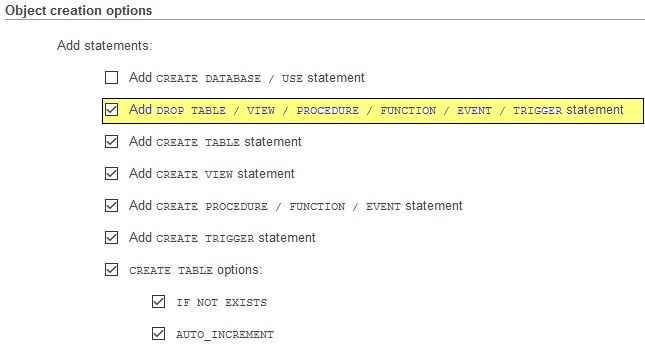
c) Leave most options but select ‘Add drop table’ to renew all tables within database.

Note 1: Select ‘create database’ as well if you intend on refreshing the database completely (you will need to drop the database).

Note 2: If you select the option of ‘truncate tables’ (not shown below), make sure to select ‘If not exists’ for table creation. Otherwise, errors will be generated.


d) Select ‘go’ to run the export function and save the outputed file in a suitable location (ie archives)  

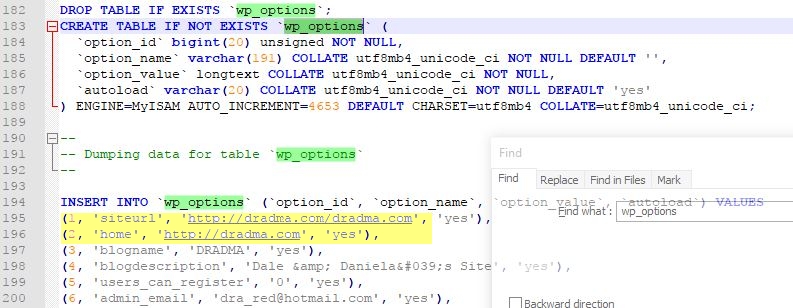
3) In exported SQL file, look for the site domain name that is specified in ‘wp_options’ table script. For example, here I am looking for the site dradma.com…

These urls will need to be modified to match what is used on localhost. For example, below I show changing the two urls to ‘http://localhost/dradma.com‘.

This has to be done for all urls. It is done quickly using the ‘find and replace’ function in your text editor.


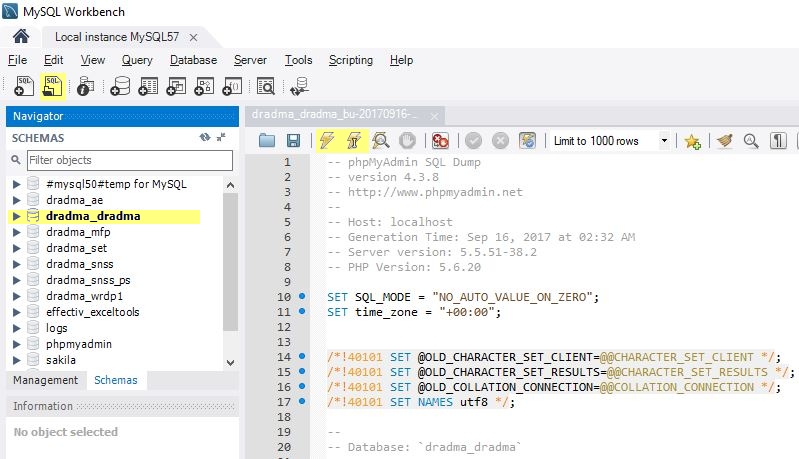
4. Import data from SQL file created in phpMyAdmin using selected MySQL client program. Below shows MySQL workbench process…open SQL file (phpMyAdmin export), check you have the correct schema/database selected, run the SQL script and check the database has successfully been imported.

If things don’t go as planned, viewing the error log will normally tell you why.
 
Uploading the database to the online site is largely a reversal of the above.


Leave a Reply

Your email address will not be published. Required fields are marked *